
Repeatable to the Step: Our 3D Printed Two Inch Focuser

Updated: 4 hours ago

Premium focusers are way too expensive. So I set out to design a two inch focuser that could be 3D printed and still give premium performance, at a fraction of the cost.
It turned out to be one of the most challenging things I have designed. I started prototyping in April 2025 and went through version after version: a new piston to press on the drive shaft, a planetary gear reducer, a tilt adjustment, a change of rails to bring the cost down. It was worth it. It turned out really well.
How It Works
The Ten Telescopes Two Inch Focuser is a Crayford style focuser. There is no rack and no gear teeth on the drawtube. A 4mm stainless steel rod presses against the drawtube, and when you turn the rod, friction moves the drawtube in or out.
Underneath the rod is a small part with a big job: the plunger. It holds a half-round piece of PTFE tube against the rod, and two small screws push it up from below. Those screws set how hard the rod presses on the drawtube, which is what lets the focuser carry a heavy camera without slipping. The last step in our build manual is a load test: with the drawtube pointing straight up, it has to hold a 1 kg load without moving.

The drawtube rides on three linear rails, the same kind of precision rails used in 3D printers and CNC machines. They keep the drawtube square and stop it from rocking or sagging, even with a camera, filter wheel and coma corrector hanging off the end.
For focusing by hand, there is a large knob for coarse focus and a small knob for fine focus. The fine focus knob drives two planetary gear stages, each with a 3:1 reduction, for 9:1 in total. The gears print in place, all in one piece.
The Real Test: Autofocus
Focusing by hand is one thing. Letting a computer do it is a much harder test.
An EAF (electronic automatic focuser) is a small motor that turns the focuser for you. To autofocus, the software moves the focuser through focus in small steps, takes a short exposure at each one and measures how big the stars are. Plotted out, that makes a V-shaped curve, and the bottom of the curve is perfect focus. Then the software has to send the focuser back to that exact spot.
That only works if the focuser does exactly what it is told. Every step has to move the drawtube the same amount, every time, in both directions. Any slip, play or sticking shows up as points that wander off the curve, or a focuser that misses the bottom when it goes back.
Here is what ours did on the night of June 22, 2026, on our Skyward 150 Astrograph "Indigo", with a ZWO EAF and a ZWO ASIAIR running the autofocus.
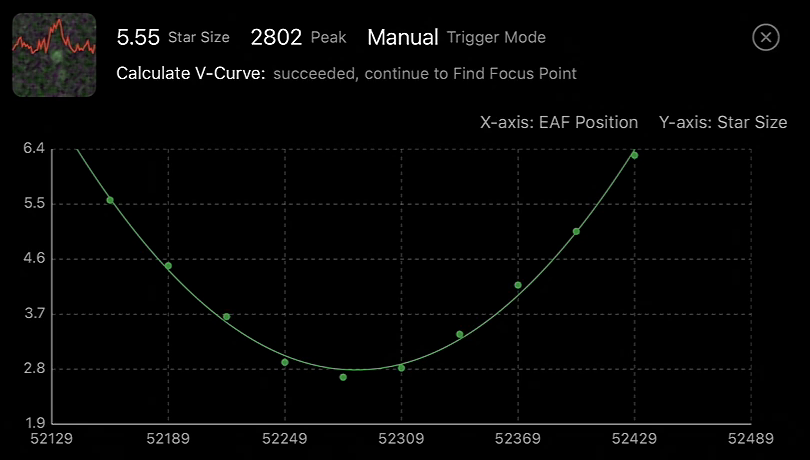
The ASIAIR stepped the focuser across about 300 steps, 30 steps at a time. Every point sits close to a clean, symmetric curve.

Then it came back in from one side and stopped at position 52285, with a star size of 2.75, right at the bottom of the curve it had just measured.
The part I am proudest of is what that telescope was using. Indigo had the budget 3D printed drawtube and a budget grade GSO coma corrector. No machined metal, no premium optics in the light path. The precision is coming from the design of the focuser itself.

Drawtube Options
The drawtube is the part that slides in and out and holds your eyepiece or camera. With our focuser you have three choices, depending on your budget and how much time you want to spend in the workshop:
3D printed drawtube. The budget option, and the one Indigo used for the autofocus results above.
DIY metal drawtube. If you want metal but would rather keep the cost down and have a bit of fun in the workshop, there is a drilling guide on our GitHub. You print the guide and use it to drill and tap an aluminum tube to make your own drawtube.
CNC machined drawtube. A black anodized aluminum drawtube, coming soon to our shop. My friend Vasu's Skyward 200 Astrograph uses one of these.
And if you would rather not build a focuser at all, there are other options. A budget 1.25 inch rack and pinion focuser is good for a Skyward 150, and an all aluminum two-speed premium focuser is there if you want to spend more and do less assembly. I go through all of these in a short video on our YouTube channel.
Build Your Own
The focuser files are free on our GitHub, and there is a full step by step build video on our YouTube channel. The focuser will also get its own section in the Skyward 200 build manual I am working on now.
A couple of tips if you print one:
Print the planetary gears with a 0.2mm nozzle if you can. They come out much smoother.
Calibrate your printer for shrinkage first. When it is right, a two inch accessory slides into the drawtube beautifully, with no slop.

Questions about building a focuser? Ask on our Discord.


Comments